


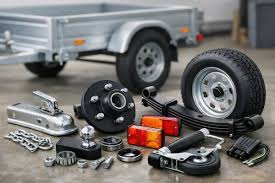
Most trailer parts don’t fail because the metal was cheap. They fail because the part that looked right was rated too low, measured a few millimetres off or was sold as universal when it wasn’t. Trailers reward careful matching and punish guesswork.
Read the compliance plate first
Every compatibility check starts with the small stamped plate on the drawbar or chassis. It lists the VIN and the legal mass ratings for that trailer, usually ATM and GTM. Those two numbers set the limit for every choice you make afterwards.
Never fit a part rated below ATM. If the plate says 2,000 kg ATM, the axles, springs, couplings, tyres and brakes must all be rated at 2,000 kg or higher. A part can bolt straight on yet still be wrong when its rating falls short. That’s where many DIY builds get into trouble.
We see this with second-hand trailers in particular. Someone upgrades to bigger wheels or adds a cage, and the weight slowly creeps up. The old springs and tyres become under-rated even though nothing looks broken. There’s no shortcut here. Read the plate. Write the numbers down. Keep them beside you while you shop.
The ratings also decide what brake hardware is legally required. In most construction rules, a trailer with GTM over 750 kg must have brakes on at least one axle. Once GTM passes 2,000 kg, brakes are required on all wheels, along with a breakaway system that can stop the trailer if it separates. You can’t choose the right brake parts until you know which weight band your trailer sits in.
Don’t guess on this stuff.
Decode the axle stamp
After the plate, the axle is the next reliable source of information. Most axles have a stamped code on the tube or a tag welded near the centre. It might read 1T or 2T, or show a part number that cross-references to 1,000 kg, 1,500 kg, 2,000 kg or 3,500 kg. That code determines much more than load capacity.
It determines the hub size and brake drum sizing, as well as spring seat width and axle tube diameter, often 45 mm, 50 mm, 60 mm or a larger tube. It also narrows down which bearings, seals, U-bolts and wheels will physically fit. Two trailers that look identical from the side can have quite different axles underneath.
Clean the tube with a wire brush and take a clear photo of any numbers you find. Measure the tube diameter with calipers, then note the distance between the spring centres. If the tag is missing, measure from hub face to hub face and count the wheel studs. A supplier can usually work backwards from those four data points (tube size, track length, spring centres and hub type) and tell you what you’ve got.
Don’t rely on the trailer brand alone. Brands sometimes change axle suppliers midway through a model run. We’ve pulled apart same-model trailers built six months apart and found different bearing sizes and spring seats. The stamp doesn’t lie. The badge sometimes does.
Measure springs, U-bolts and shackles
Leaf springs cause more returns than almost any other trailer part. People often assume there’s a standard trailer spring, but there isn’t.
You need the eye-to-eye length measured in a straight line rather than along the curve. Record the width, thickness and number of leaves, along with the free camber, which is the curve of the unloaded spring, and its load rating. A 60 mm difference in length or a different camber will alter the ride height and place an uneven load on a tandem set. That wears tyres quickly and overloads one axle.
Shackles and pins also vary. Eye diameter, bolt diameter and hanger spacing differ between makers. U-bolts come in different diameters and thread pitches, while the clamp position matters because the plate must sit flat on the spring without pinching the leaves. Order these parts by measurement rather than by what fitted your mate’s trailer.
Take the old spring off before ordering if you can. Lay it flat. Measure it twice. Take photos showing the shackle angle and hanger position. If the trailer currently sits level and tows straight, you want to reproduce the same geometry. If it sags or sways, treat that as a separate setup issue to fix after you’ve matched the baseline parts.
Replace bearings and hubs as a matched set
Hubs are generally built around 1-tonne, 2-tonne and 3.5-tonne capacities, with different bearing combinations for each. The cone and race wear together as a pair. The seal must suit both the hub bore and axle journal, while the grease cap, split pin and nut must match the thread.
Don’t mix a new cone with an old race. Don’t press the wrong race into the hub simply because it feels close. That shortcut causes heat buildup and early failure. It often begins as a low rumble at speed, becomes a hot hub at the fuel stop and ends with a wheel coming off on the highway. It’s one of the most expensive towing mistakes because it can damage the axle journal and drum as well.
Once you have photos of the compliance plate, axle stamp, old bearings and hub markings, a specialist in trailer spare parts gold coast can cross-check the numbers and confirm that the kit matches before you pay. That single check removes most of the risk.
Buy bearings as a complete kit, with the cones, races, seals and caps boxed for your hub type. Replace both sides of the axle at the same time. Pack them with high-temperature bearing grease made for disc or drum trailer hubs. Adjust the nut to remove play without preloading the bearings, then check the adjustment again after the first short tow.
Match the PCD before you order wheels or drums
PCD means pitch circle diameter. It’s the bolt pattern that must align between the wheel and hub. Common patterns include 5 x 114.3 and 6 x 139.7, along with heavier 5-stud and 6-stud variants that use different diameters.
A 6-stud wheel is not automatically compatible with every 6-stud hub. Fit a 6 x 139.7 wheel to a hub drilled for a smaller 6-stud circle and the studs will bend. You might manage to get the nuts on in the driveway, but they won’t stay tight. The studs can shear under highway load, and the resulting damage is sudden.
Measure it correctly. For a 5-stud hub, measure from the centre of one stud to the outer edge of the farthest stud, then confirm the result with a PCD chart. For 4-stud and 6-stud hubs, measure centre to centre across opposite studs. Count the studs and record the stud diameter and thread. Check the centre bore diameter so the wheel seats properly on the hub rather than resting only on the nuts.
The same rule applies to brake drums with integral hubs. Drum diameter must match the backing plate assembly, while the stud pattern must match your wheels. If you’re changing PCD, the hubs and wheels need to be changed together. No adapter makes a mismatched combination safe for loaded towing.
Confirm brakes, couplings and wiring
Brakes require both the physical fit and electrical setup to match. Start by confirming the system type. Electric drum brakes run on 12 volts and use a magnet to pull the shoes against the drum when the in-cab controller sends current. Hydraulic override brakes use a sliding coupling that pushes fluid to the wheel cylinders as the trailer surges forward. Parts cannot be swapped between those systems.
For electric drums, match the drum diameter, shoe width, magnet part number and backing plate bolt pattern. A common size is 200 x 50 mm, but don’t assume that’s what you have. Measure the old drum’s inside diameter and the shoe width. Note the wire colours and shape of the magnet arm. The magnet must suit your controller type and voltage, otherwise the braking may feel grabby or weak.
Heavier trailers also use a breakaway system with its own battery and switch. The battery must hold charge and connect to the electric brake circuit so the brakes apply if the trailer separates. Test the battery under load. Check the switch pin and cable as well. Corroded pins are a common defect found at inspection time.
Couplings require the same attention. A 50 mm ball coupling and a 70 mm ring type have different ratings and suit different towing setups. The rating stamped on the coupling must meet or exceed ATM. Check the bolt hole pattern and drawbar width before ordering. If the coupling is worn or the latch has play, replace it instead of rebuilding around it.
Wiring causes problems too. Flat and round 7-pin plugs use different pin positions, so the plug must match the tow vehicle. LED lights draw less current than old incandescent globes, and some vehicles need a load resistor or adapter to prevent fast flashing. Most lighting faults we’ve traced lead back to a bad earth. Clean the earth point to bare metal and run a dedicated earth wire instead of relying on the hitch ball for the return path.
Use part numbers and ask for a cross-check
Online shopping is easy to get wrong because many parts look alike in photos. Cross-reference numbers provide a more reliable match. Most running gear carries an OEM number from makers such as AL-KO and Dexter, while other factory brands stamp numbers into drums, magnets and couplings. A good supplier can use those numbers to confirm that the replacement matches the factory-fitted part.
Gather four pieces of information before you call or place an order: the VIN and ATM from the plate, the axle code and tube size, measurements and photos of the old part, plus the brake and wiring details. That information lets someone identify the correct part in minutes instead of guessing their way through three returns.
Measure twice, order once. It may sound slow. It’s still faster than waiting for a second freight delivery while the loaded trailer sits in the driveway.
When something doesn’t line up, ask before buying. A five-minute call is cheaper than dealing with a blown bearing, defect notice, tow truck fee and insurance headache after losing a wheel. Bring the numbers with you. A specialist can spot the wrong PCD or an under-rated tyre in seconds. Careful checking is what keeps a trailer safe when the load is heavy and the speed is up.
Trailers are simple machines, but their tolerances are tight. Get the ratings right, match the measurements and keep the hubs, brakes and wheels working as a set. Do that and the parts you fit should keep the trailer towing straight for years.
